The Difference in the Details: OD vs ID

The intricate world of tubing measurements where every millimeter matters! Our exploration of the “Difference Between OD vs ID” dives into the often overlooked, yet crucial aspects of tube manufacturing that impact industries from aerospace to plumbing.
Understanding the outer diameter (OD) and inner diameter (ID) is not just about numbers—it’s about unlocking the secrets to precision, efficiency, and innovation in design and application. Whether you’re a seasoned engineer or a curious novice, this post will illuminate the subtleties of tube dimensions that could redefine how you view the framework of everyday objects. Join us as we unravel the mystery and magnify the minutiae in this fascinating exploration.
What Is The Difference Between OD vs ID Tube?
When delving into the world of tubes, whether for engineering, construction, or various manufacturing processes, understanding the difference between OD (Outer Diameter) and ID (Inner Diameter) is crucial. These two measurements are foundational in specifying the size and attributes of tubes, ensuring they meet the required specifications for their intended use.
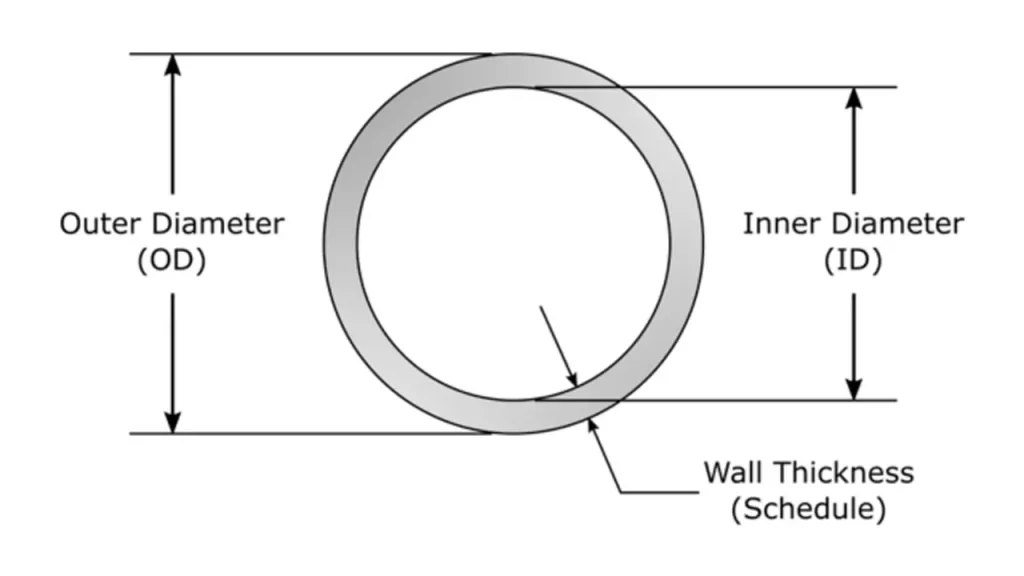
Outer Diameter (OD) refers to the total diameter of the tube from outer edge to outer edge. It is a critical measurement often used when considering the mounting or fitting of the tube in various applications, such as in bearings, frames, or other structural components. The OD is essential for ensuring that the tube fits perfectly in a system, aligning with other parts without any discrepancies.

Inner Diameter (ID), on the other hand, indicates the diameter of the empty space within the tube. It’s the measurement across the inside of the tube, dictating how much material can pass through it. This dimension is particularly important for applications involving fluid dynamics, where the flow rate, pressure, and the speed of the fluid are influenced by the size of the ID.
The relationship between OD and ID is further characterized by the wall thickness of the tube, which is the difference between the outer diameter and the inner diameter, divided by two. This wall thickness plays a pivotal role in the tube’s strength and performance, particularly in scenarios where the tube needs to withstand internal pressures or external forces.
How OD and ID Relate
Understanding how the Outer Diameter (OD) and Inner Diameter (ID) of a tube relate to each other is key to grasping the overall functionality and structural integrity of tubular components. This relationship not only determines the physical characteristics of the tube but also influences how it can be used in various applications.
The Wall Thickness Factor
The wall thickness of a tube, which is calculated by subtracting the ID from the OD and then dividing by two, essentially connects these two measurements. This thickness affects how much pressure the tube can withstand internally or externally, making it a crucial factor in industries such as hydraulic systems, automotive manufacturing, and aerospace engineering.
For example, if a tube needs to handle high-pressure fluids, a greater wall thickness (resulting from a larger OD relative to the ID) would be necessary. This configuration ensures the tube does not fail under pressure, maintaining integrity throughout its operation.
Balancing Strength and Weight
In practical terms, the relationship between OD and ID is also about balancing strength with material efficiency. A tube with a large OD and a small ID has a thicker wall, which typically offers more strength and can handle more stress. However, this comes at the cost of increased weight and material usage, which might not be desirable in applications where weight is a critical factor, like in aerospace or high-performance sporting equipment.
Conversely, a tube with a smaller OD and a larger ID will have a thinner wall, reducing weight and material cost. This configuration is suitable for applications where internal pressures are low, and reducing the weight is beneficial to the overall design of the system.
Precision in Engineering
The precision in measuring and relating OD and ID is paramount in industries where exact specifications are critical. For instance, in the medical field, where catheters and surgical tools require tubes, the exact relation of OD to ID can affect not only the performance of these tools but also patient safety.
Measurement Techniques
Accurately measuring the Outer Diameter (OD) and Inner Diameter (ID) of tubes is critical in ensuring they meet specific requirements and perform as expected in their respective applications. Different measurement techniques are employed based on the precision required, the material of the tube, and the environment in which the measurement takes place.
Calipers and Micrometers
The most commonly used tools for measuring OD and ID are calipers and micrometers. Calipers can be adjusted to fit around the exterior of the tube to measure the OD or inserted into the tube to gauge the ID. For higher precision, micrometers are used, which offer more refined measurements and can differentiate down to thousandths of an inch. Micrometers are particularly useful in applications requiring extremely tight tolerances, such as in the aerospace or precision engineering industries.
Optical and Laser Methods
For non-contact measurement, optical and laser methods are increasingly popular, especially in settings where the tube material may be sensitive to physical touch or needs to be measured in a non-invasive way. These methods use light or laser beams to capture the exact dimensions of a tube without making direct contact. This technique is beneficial for soft materials or tubes that can deform under physical measuring tools.
Ultrasonic Thickness Gauging
Another sophisticated technique involves ultrasonic thickness gauging, which is especially useful for determining wall thickness and, by extension, indirectly measuring OD and ID. This method sends an ultrasonic wave through the tube wall and measures the time it takes for the echo to return. From this data, the instrument calculates the wall thickness, helping to deduce the ID when the OD is already known.
Tube Sizing and Plug Gauges
In manufacturing environments, tube sizing gauges and plug gauges are often used to quickly verify dimensions during production runs. These gauges are designed to specific tolerances and can quickly determine if a tube’s OD or ID falls within acceptable limits, ensuring consistency in production.
Precision and Challenges
While these measurement techniques are highly effective, they also come with challenges, particularly in terms of the environment in which measurements are taken and the skill level of the operator. Factors like temperature, humidity, and even the positioning of the tube can affect measurements. Moreover, operator expertise plays a significant role in achieving accurate measurements, as improper tool use can lead to significant errors.
Clarify Frequent Misconceptions About OD and ID
When discussing tube measurements, there are several common misconceptions about Outer Diameter (OD) and Inner Diameter (ID) that can lead to confusion and errors in application and specification. Clarifying these misunderstandings is essential for professionals and hobbyists alike to ensure accurate usage and interpretation of tube dimensions.

OD and ID are Interchangeable
A frequent misunderstanding is that OD and ID can be interchanged or are less critical as long as one dimension is correct. This is not the case; each serves a specific function. OD is crucial for fitting purposes—ensuring the tube fits precisely within an external system, like housings or fixtures. On the other hand, ID is key for capacity—determining the volume of fluid that can pass through the tube. Ignoring the specific importance of each can result in mechanical failures, inefficiencies, or safety hazards.
Wall Thickness is Uniform
Another common misconception is assuming that wall thickness is uniform across all types of tubing. In reality, the wall thickness can vary significantly depending on the material, manufacturing process, and intended use of the tube. Tubes designed to withstand high pressures may have thicker walls, whereas tubes used for light structural purposes might have thinner walls. Assuming uniformity can lead to incorrect calculations and inappropriate applications.
Measurement Methods Yield Similar Accuracy
People often believe that all measurement tools provide the same level of accuracy. However, tools like calipers, micrometers, and ultrasonic gauges differ significantly in their precision. Calipers are suitable for quick, general measurements, while micrometers provide more precise measurements critical for high-tolerance applications. Ultrasonic gauges are used for non-invasive measurements, important for delicate or dangerous materials. Choosing the wrong tool can lead to data that is not sufficiently accurate for the application, potentially causing operational failures.
Any Tube Size Can Fit Any Application
It’s a common misconception that tubes are generally versatile and can be adapted to any application regardless of their OD and ID specifications. Each tube is often designed with specific OD and ID measurements tailored to particular pressure ratings, flow rates, and structural requirements. Misapplying a tube size can compromise system integrity and performance.
OD and ID Definitions are Universally Understood
There’s often an assumption that the definitions of OD and ID are universally understood across different industries. However, the significance and exact interpretation can vary. For example, in the context of tubing for medical devices, precision in ID might be more critical than in industrial applications where OD might be the primary concern due to fitting requirements.
Conclusion
In conclusion, understanding the difference between OD (Outer Diameter) and ID (Inner Diameter) is essential for anyone involved in the design, engineering, or use of tubing. These dimensions not only define the structural integrity and functional capacity of tubes but also influence their compatibility with other components and systems.
We explored how OD determines the fitting and mounting of tubes, while ID influences flow capacity and internal pressures. We also clarified common misconceptions and discussed accurate measurement techniques to ensure you select and utilize tubes effectively in your projects. Armed with this knowledge, you can enhance the precision and efficiency of your work, leading to more robust and reliable outcomes.
